
Contents
- Introduction
- Prerequisites
- Step 1 - Create an Empty Hosting Package
- Step 2 - Connect your GitHub Account
- Step 3 - Select and Clone your Repository
- Step 4 - Getting your Laravel Application Live
- Step 5 - SSL, DNS, Email & More
Introduction
Laravel is an open-source PHP framework that provides a set of tools and resources to build modern PHP applications, and not coincidentally, it's also the most starred PHP framework on GitHub! Laravel has been crafted by a collaborative community to provide a seamless and elegant developer experience, and so, it deserves a hosting experience to match!
alttrixcloudCloud is a Managed Cloud Server environment that's been built from the ground up to host a wide range of applications, and can be provisioned with a technical profile designed specifically for hosting Laravel applications.
Laravel Technical Profile Details
| Service | Details |
| MariaDB | Faster query speeds and can handle a higher number of concurrent connections efficiently. |
| NGINX | High-Performance Web Server for faster static file serving over Apache2. |
| PHP-FPM | Pre-configured PHP-FPM to manage PHP processes. Its main advantage is that it can handle a high volume of queries, making it especially useful for sites with heavy traffic or complex web applications. |
| Redis 6 | Caches data in-memory, Redis allows for rapid retrieval of frequently accessed data like product details and user sessions, significantly reducing database load. |
In this guide we'll walk you through the process of hosting your Laravel application with alttrixcloudCloud.
Prerequisites
- A GitHub repository with your Laravel application.
- A alttrixcloudCloud Server with the Laravel profile.
Step 1 - Create an Empty Hosting Package
Before you can clone your Laravel application from your GitHub account, you need to create a hosting package. This will contain your application files, databases and emails if necessary.
- Head to Managed Cloud Server
- Select Hosting Packages and then Add Hosting Package.
- Select your Cloud Server and enter a Domain Name (this can be changed later).
- Now select Create Hosting Package.

Your hosting package will be provisioned on your alttrixcloudCloud Server ready for your Laravel application. You'll be able to manage DNS, apply the Free SSL, add email accounts and much more alongside the running of your application.
Step 2 - Connect your GitHub Account
You'll now be able to connect your GitHub account to enable you to select and clone the repository containing your Laravel application.
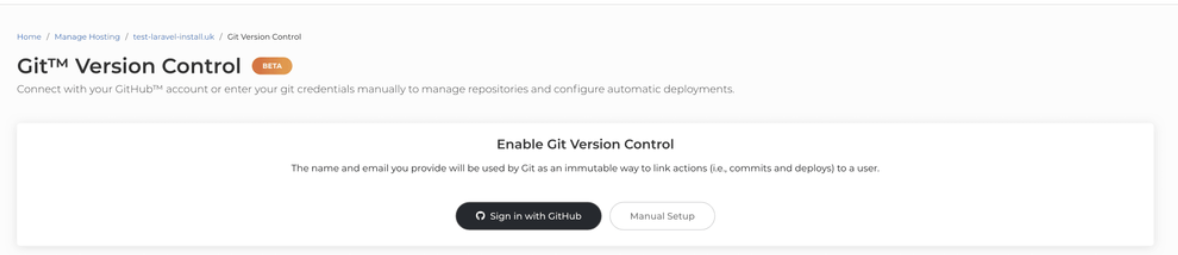
Head to Git Version Control icon.
![]()
Select Sign in with GitHub. You can also use Manual Setup if you'd like to enter the details of your Git repository manually.
3. Select Install & Authorize to allow the alttrixcloud Git Manager application to access your selected repositories.
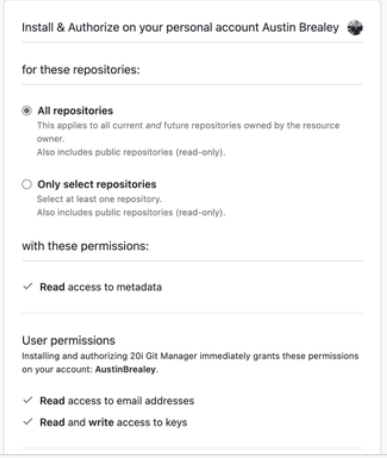
alttrixcloud Git Manager will then be install and initiated as a GitHub Application with the permissions and access specified during the install. You can manage the application settings from within GitHub Applications. You can also Sign Out of GitHub from the Git Version Control page in Myalttrixcloud.
Step 3 - Select and Clone your Repository
Now you've connected your GitHub Account you'll be able to see and manage your repositories from the dropdown menu. You can now go about choosing a repository that you want to clone from, to do this:
1. Find and select the repository that you want to clone from.

2. Once selected you'll see the Clone a Repository section pre-filled with the repository information needed, select Create at the bottom to clone the repository into the path selected.

3. Your application will be cloned onto your alttrixcloud hosting package on your Cloud Server.
Step 4 - Configure Laravel for Production
Now that your application has been cloned onto your alttrixcloud hosting package, it's time to configure and deploy your Laravel application. This involves several key steps to ensure your application is optimised for a production environment.
1. Create a .env File and Set Environment Variables
Use the alttrixcloud Command Executor (or SSH) to create a .env file. This file is crucial as it holds all the environment-specific settings for your application, such as database credentials, cache settings, and more. Ensure you do not commit this file to your source control to avoid exposing sensitive information.

Example .env content:
APP_NAME=Laravel
APP_ENV=production
APP_KEY=base64:...
APP_DEBUG=false
APP_URL=https://yourdomain.com
DB_CONNECTION=mysql
DB_HOST=127.0.0.1
DB_PORT=3306
DB_DATABASE=your_database
DB_USERNAME=your_username
DB_PASSWORD=your_password
CACHE_DRIVER=redis
QUEUE_CONNECTION=database
SESSION_DRIVER=file
SESSION_LIFETIME=120
To generate a .env file using the command executor in the alttrixcloud Laravel tools, you can run the following command:
cp .env.example .envYou can then use the alttrixcloud Env Configuration to update the .env file to set appropriate values for your environment.

2. Install Dependencies
Once your environment variables are set, use the alttrixcloud Command Executor (or SSH into your server) and run the following command to install all required PHP dependencies:
composer install --no-dev --optimize-autoloaderThis ensures that only production dependencies are installed, and the autoloader is optimized for faster performance.
3. Build Assets for Production
If your application uses frontend assets like JavaScript or CSS, you need to compile and minify them for production. This is usually done using tools like Laravel Mix:
npm ci
npm run production
These commands install the necessary Node.js dependencies and compile the assets.
4. Cache Configuration Files
To boost your application's performance, cache the configuration and route files:
php artisan config:cache
php artisan route:cache
php artisan view:cache
These commands compile your configuration, routes, and views into single files to reduce the number of file system accesses.
5. Run Database Migrations
Ensure your database is up to date with the latest schema by running the migrations:
php artisan migrate --forceThe --force flag is necessary to run migrations in a production environment.
6. Restart Services
Finally, restart the necessary services to apply the changes:
php artisan queue:restartBy following these steps, your Laravel application should be well-configured for a production environment on your alttrixcloudCloud server.
Step 5 - SSL, DNS, Email & More
alttrixcloudCloud Servers are perfect for hosting your live Laravel applications and come with all the tools you need to make your live application.

1. Apply the Free SSL
Head to the SSL/TLS Certificates section and select Enable to install a free Wildcard Let's Encrypt SSL.
2. Ensure DNS is Correct
You can manage your DNS through the Manage DNS section. The A Records are already configured to serve traffic to your application, ensure your nameservers are pointing to alttrixcloud's nameservers.
3. Set Up Email Accounts
alttrixcloudCloud Servers come with Unlimited 10GB Mailboxes. Head to Email Accounts and add any mailboxes that you need.
